 Save to Pinterest
 My sister called me in a panic two days before Easter, asking if I could make something special for her brunch table that wouldn't melt in the spring sunshine. I'd never made cake pops before, but something about the idea of these jewel-toned bites felt right for the occasion. The first batch taught me patience—rushing the freezing step meant cake balls sliding off their sticks like tiny avalanches—but by the second try, I'd found the rhythm, and suddenly my kitchen smelled like vanilla and melted chocolate in the most comforting way.
Watching my nephew's eyes light up when he saw those speckled blue orbs sitting in their Styrofoam nest made every sticky finger and chocolate-splattered apron worth it. He carefully selected one, examined it like a gem, and took the smallest bite to make it last. That's when I realized these weren't just desserts—they were edible little moments of joy that belonged on a celebration table.
Ingredients
- Vanilla cake mix: A box mix saves time without sacrificing flavor, though homemade cake works beautifully if you prefer from-scratch baking.
- Unsalted butter and powdered sugar: These create a frosting that's smooth enough to bind the cake crumbs but sturdy enough to hold shape through dipping.
- Milk and vanilla extract: Just enough to bring the frosting together and add a whisper of flavor without making it too soft.
- White candy melts or white chocolate: Candy melts melt more smoothly and won't seize as easily, but real white chocolate tastes richer if you're careful with the heat.
- Blue gel food coloring: Oil-based gel coloring is essential here because water-based coloring can cause the chocolate to seize and become grainy.
- Coconut oil or vegetable shortening: These thin the coating without affecting the flavor, making dipping easier and creating a thinner shell.
- Cocoa powder and vodka or clear extract: The alcohol evaporates quickly, leaving behind delicate speckles that look like bird egg spots.
- Lollipop sticks and Styrofoam block: The sticks become handles, while the block keeps everything upright while setting.
Tired of Takeout? 🥡
Get 10 meals you can make faster than delivery arrives. Seriously.
One email. No spam. Unsubscribe anytime.
Instructions
- Bake and cool your cake:
- Follow the box directions, then let the cake cool completely on the counter—warm cake will make your frosting melt and slide right off those sticks later. Don't skip this step or you'll regret it.
- Make a frosting that sticks:
- Cream the butter until it's pale and fluffy, then gradually add the powdered sugar so there are no lumps hiding in there. The milk and vanilla should go in slowly, making the frosting smooth enough to spread but thick enough to hold its shape.
- Combine cake and frosting:
- Crumble that cooled cake finely into a bowl, then add frosting bit by bit while mixing with your hands—this is where you feel your way to the perfect texture. You want it to hold together when squeezed but not feel greasy or overly wet.
- Roll balls with intention:
- Use a tablespoon measure or small cookie scoop so each pop is roughly the same size, then place them on parchment to chill. Fifteen minutes in the freezer firms them up just enough to handle the next step without cracking.
- Melt and tint the coating:
- Whether you use a double boiler or microwave, warm the candy melts gently in 20-second intervals to keep them silky smooth. Add your blue gel food coloring a tiny bit at a time, stirring well—the color deepens as you go, so it's easy to overshoot.
- Stick the pops:
- Dip each stick's tip briefly into the warm coating, then push it halfway into a frozen cake ball. Refrigerate for ten minutes so the coating hardens and the stick won't wiggle loose during the full dip.
- Dip with confidence:
- Rotate each pop slowly in the warm coating, letting the excess drip off for a few seconds before standing it upright in the Styrofoam block. The coating should set within a few minutes as it cools.
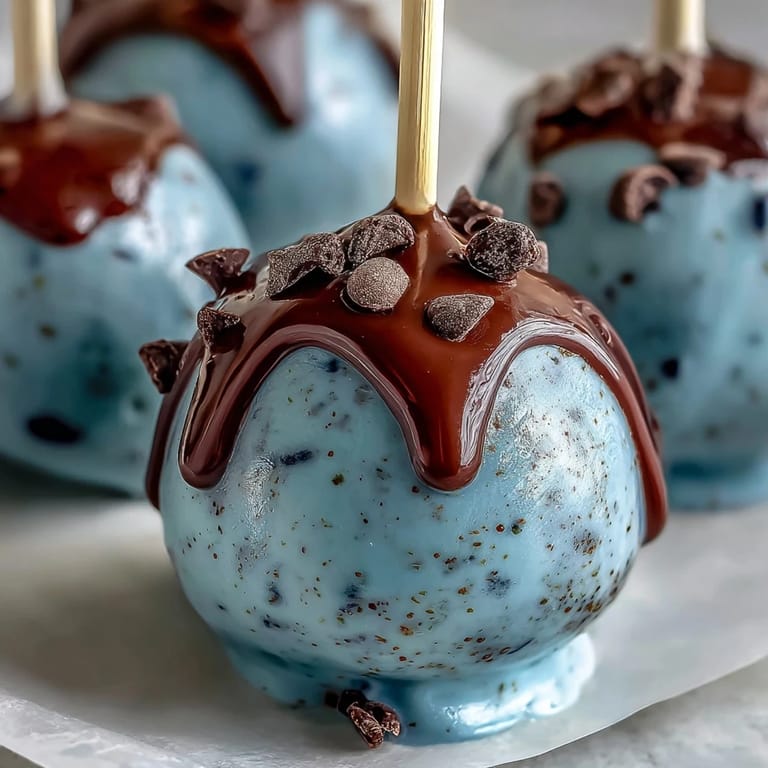
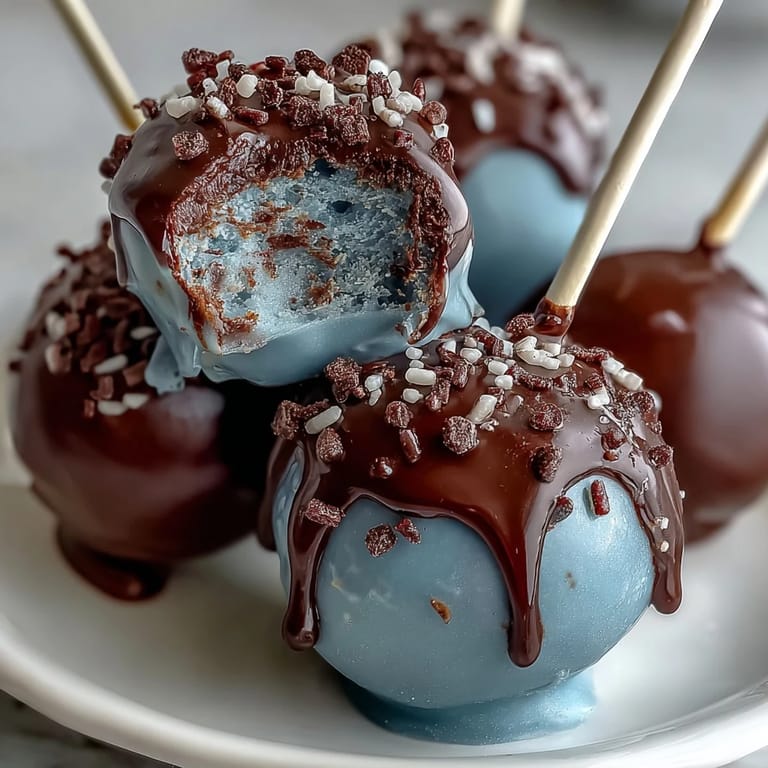
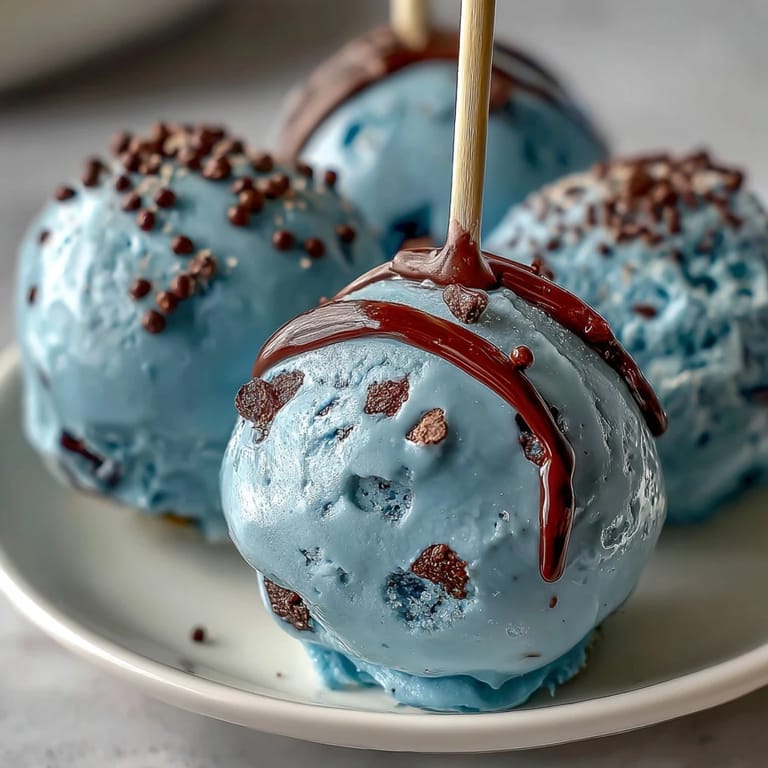
- Add the speckled magic:
- Mix cocoa powder with vodka or extract into a thin paste, dip a clean brush in it, and flick the bristles gently over each pop while the coating is still tacky. The speckles will look like tiny bird egg details and make the whole thing feel more special.
- Let them set completely:
- Wait at least thirty minutes before handling them so the coating fully hardens and won't crack under pressure.
 Save to Pinterest
 There's something almost meditative about standing in front of a dozen cake pops, brush in hand, creating tiny speckles that transform them from pretty to absolutely enchanting. It's the kind of detail work that makes you slow down and actually be present in the cooking process, which honestly doesn't happen often enough in my kitchen.
Flavor Twist Ideas
The vanilla-chocolate combination is classic, but these pops are a canvas waiting for your creativity. I've experimented with adding lemon extract or almond extract to the frosting, which adds brightness without overwhelming the delicate cake flavor. A friend suggested mixing a little coffee into the frosting, which sounds unexpected but pairs beautifully with chocolate and makes the whole thing feel slightly more sophisticated.
Storage and Make-Ahead Magic
These pops can sit at room temperature for up to three days without any trouble, which makes them perfect for preparing a day or two before an event. If you want to make them further ahead, store them in the refrigerator for up to a week—just let them come back to room temperature for about ten minutes before serving so the coating tastes its best. I've also frozen unbaked cake balls for up to two weeks, which means you can do all the hard work whenever you have time and finish the dipping and decorating closer to your event.
- Room temperature storage keeps the coating at its ideal texture and prevents condensation from making things sticky.
- A closed container prevents them from absorbing flavors from your fridge while they sit there.
- If the coating ever cracks during storage, a quick dip in warm coating smooths it right out.
Troubleshooting Common Cake Pop Disasters
The most common issue I see is cake balls falling off their sticks mid-dip, which happens when they're either too warm or not frozen solid enough. If your coating keeps getting weird and grainy, you've likely used water-based food coloring or gotten water into the chocolate somehow—start fresh with fresh candy melts and oil-based coloring. Sometimes the coating ends up too thick and gluggy, which is easily fixed by stirring in a teaspoon of coconut oil and giving the mixture a minute to relax.
 Save to Pinterest
 These robin's egg cake pops have become my go-to for any spring gathering, and honestly, they're just as rewarding to make as they are to eat. There's something about creating something this beautiful from simple ingredients that reminds you why you love spending time in the kitchen.
Recipe FAQs
- → What gives the coating its robins egg blue color?
Blue gel food coloring, preferably oil-based to prevent seizing, is blended into melted white chocolate or candy melts.
- → How do I achieve the speckled effect?
A mixture of cocoa powder and vodka or clear extract is flicked gently over the coated pops using a food-safe brush to create natural speckles.
- → Can I prepare these ahead of time?
Yes, coating and setting take time, so pops are chilled before and after dipping to ensure firm texture and secure coating.
- → Are there suitable substitutes for coconut oil in the coating?
Vegetable shortening can be used as an alternative to thin the coating if needed.
- → How should I store these treats?
Store at room temperature for up to three days or refrigerate for up to a week to maintain freshness.