 Save to Pinterest
 My neighbor texted me last minute asking if I could bring something to her housewarming party, and I found myself staring at the clock with about two hours to pull off something impressive. These mini cheesecakes came to mind because they look like you spent all day in the kitchen, but honestly, they're deceptively simple and always make people's eyes light up. The first time I made them, I was nervous about how such tiny desserts could taste so rich and creamy, but one bite proved me wrong. Now they're my go-to when I need something that feels special without the stress.
I'll never forget watching my friend's face light up when she bit into one of these at her open house, then immediately asking for the recipe so she could make them for her book club. That's when I knew these weren't just a last-minute save but something worth keeping in my regular rotation. There's something about bite-sized desserts that makes people feel like they can have more than one, which is probably why the whole batch disappeared within twenty minutes.
Ingredients
- Graham cracker crumbs (1 cup, about 100 g): Use fresh ones if you can, not the ones that have been sitting in your pantry for months because they do get stale and won't press down as nicely.
- Granulated sugar for crust (2 tbsp, 25 g): This tiny amount adds just enough sweetness to the crust without making it compete with the filling.
- Unsalted butter, melted (4 tbsp, 60 g): Melted is key here because it distributes evenly and helps everything stick together when you press it down.
- Cream cheese, softened (16 oz, 450 g): This is non-negotiable, so pull it out of the fridge at least an hour before you start to avoid lumpy filling.
- Granulated sugar for filling (2/3 cup, 135 g): Mix this thoroughly with the cream cheese until it's perfectly smooth or your cheesecake will have a grainy texture.
- Large eggs (2): Room temperature eggs blend in more smoothly and create a better texture overall.
- Sour cream (1/3 cup, 80 ml): This adds tanginess and keeps the cheesecake from being too dense, so don't skip it.
- Vanilla extract (1 tsp): Real vanilla makes a noticeable difference in something this simple.
- All-purpose flour (1 tbsp, 8 g): Just a tablespoon keeps the filling from cracking on top as it bakes.
- Salt (pinch): A tiny pinch brings out all the other flavors without tasting salty.
Tired of Takeout? 🥡
Get 10 meals you can make faster than delivery arrives. Seriously.
One email. No spam. Unsubscribe anytime.
Instructions
- Get your oven ready and line the tin:
- Preheat your oven to 325°F and line a 24-cup mini muffin tin with paper liners, which makes cleanup so much easier and keeps the cheesecakes from sticking. Trust me on this because burnt edges are not the vibe.
- Make the crust mixture:
- Combine graham cracker crumbs, sugar, and melted butter in a bowl until it looks like wet sand. This happens faster than you'd think, so don't overmix.
- Press crusts into place:
- Divide the mixture among your liners (about a heaping teaspoon per cup) and press down firmly with your finger or the back of a small spoon. The crust should be compact but not rock-hard, just sturdy enough to hold the filling.
- Blend the cream cheese base:
- Beat the softened cream cheese until it's perfectly smooth, then gradually add sugar and mix until creamy and combined. If you go too fast, you'll incorporate air bubbles that can cause cracks later.
- Add the eggs carefully:
- Add eggs one at a time, beating gently after each one just until mixed in. Overmixing at this stage brings in too much air.
- Finish the filling:
- Stir in sour cream, vanilla, flour, and salt just until everything is combined. This is the point where you stop mixing, not a second more.
- Fill the crusts:
- Spoon the filling over each crust until it's nearly to the top of the liner. A small ice cream scoop makes this incredibly fast and even.
- Bake until just set:
- Bake for 18 to 20 minutes until the centers jiggle ever so slightly when you tap the pan but the edges look set. This is the sweet spot between creamy and cooked through.
- Cool gradually:
- Let them cool in the pan for 15 minutes, then transfer to a wire rack to cool completely. Cooling slowly prevents cracks from forming on top.
- Chill before serving:
- Refrigerate for at least an hour before eating, though overnight is even better because the flavors meld and the texture becomes silkier. Cold cheesecake is always better than warm.
- Add your toppings:
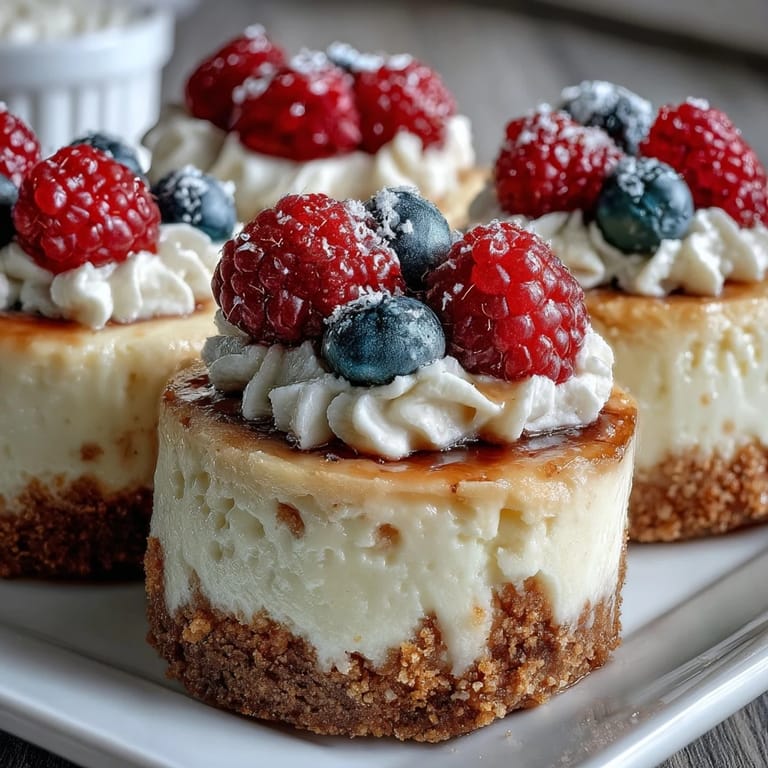
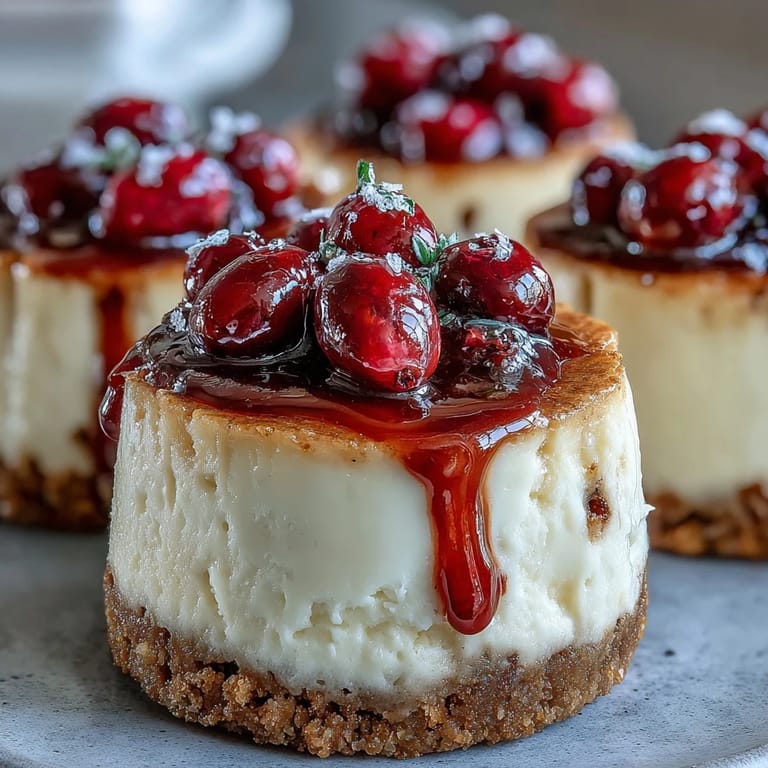
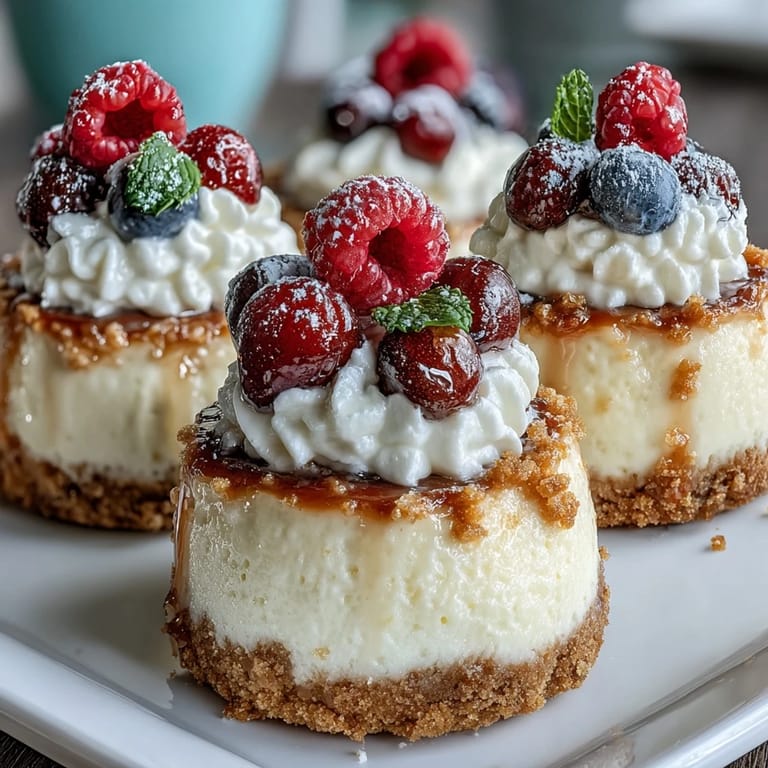
- Just before serving, top with fresh berries, fruit preserves, whipped cream, or chocolate shavings depending on your mood and what you have on hand.
 Save to Pinterest
 There's a moment when you pull these out of the oven and see them puffed up slightly, their edges just barely golden, that makes you feel like a real baker even though the hardest part was just waiting. My sister once said these taste like cheesecake had a baby with a petit four, which is somehow the perfect description.
Storage and Make-Ahead Magic
One of the best things about these mini cheesecakes is that they're incredibly forgiving with timing. You can make them a full day ahead and store them covered in the refrigerator, which honestly lets the flavors settle and get even better. I've even frozen them (without toppings) for up to two weeks, then thawed them gently overnight before serving with fresh toppings.
Flavor Variations to Try
The base recipe is like a blank canvas waiting for you to get creative. I once added lemon zest to half the batch for a party where someone's neighbor brought her own Meyer lemons, and it completely transformed the flavor into something bright and unexpected. Peppermint extract, almond extract, cinnamon, or even a swirl of salted caramel work beautifully if you want to play around.
Topping Ideas and Final Thoughts
The toppings are where these really shine because you can customize each one or go with a simple berry situation depending on the occasion. Don't add toppings more than a few minutes before serving, or you'll end up with soggy cheesecakes and bruised berries looking sad on top.
- Fresh berries, preserves, and whipped cream should go on just before the cheesecakes hit the table.
- Chocolate shavings stay looking crisp if you add them right at the moment of serving.
- If you're making these ahead, keep toppings separate in the fridge and assemble on-site for maximum freshness and wow factor.
 Save to Pinterest
 These mini cheesecakes have become my secret weapon for any occasion where I want to look like I spent hours in the kitchen when really I spent less than thirty minutes active time. They taste like love in a tiny package, which is honestly all anyone needs.
Recipe FAQs
- → What is the best way to get a crisp crust?
Use melted butter evenly mixed with graham cracker crumbs and sugar, pressing firmly into the muffin liners before filling.
- → How do I ensure the filling sets properly?
Bake at 325°F until the centers are slightly jiggly, then chill for at least an hour to fully firm up.
- → Can I prepare these in advance?
Yes, these mini cheesecakes can be made a day ahead and stored refrigerated to enhance the flavors.
- → Which toppings complement these mini cheesecakes?
Fresh berries, fruit preserves, whipped cream, and chocolate shavings all enhance the taste and presentation.
- → Are there gluten-free options available?
Substitute gluten-free graham crackers and flour to make a gluten-free version without compromising texture.