 Save to Pinterest
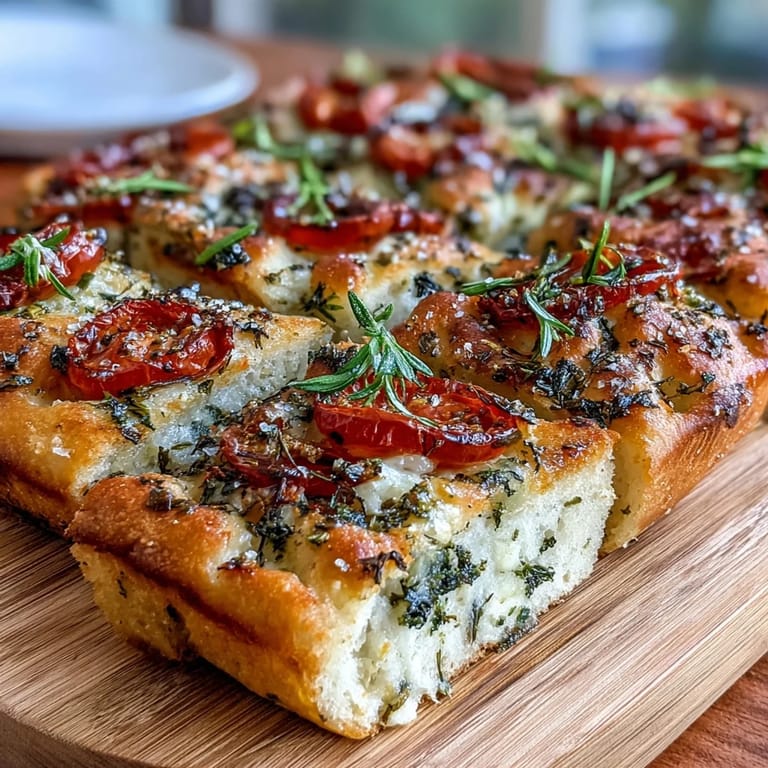
 My sister called me in a panic three weeks before her baby shower, asking if I could bring something that looked as lovely as it tasted. I'd been experimenting with focaccia that spring, playing around with the dough ratios and timing, when it hit me—what if I turned the bread itself into a canvas? The moment those first bell pepper rings caught the oven light and transformed into delicate flower petals, I knew I'd found exactly what she needed. That bread became the centerpiece everyone photographed before eating it.
I made this for the first time on a Saturday morning when the light was streaming through my kitchen windows just right. My neighbor stopped by to borrow something and ended up watching the whole process, asking questions about why I was slicing vegetables so thin and what the point was of arranging them before baking. Twenty-five minutes later, when I pulled it from the oven and she saw those golden vegetables arranged like a garden in bloom, she understood completely. She asked for the recipe that day, but honestly, I think what she really wanted was the excuse to make something that beautiful.
Ingredients
- Bread flour: The high protein content gives you that chewy, structured crumb that holds up to all those vegetable toppings without getting soggy or dense.
- Instant yeast: Works faster than active dry yeast, which matters when you're on a timeline, though either one will work if you adjust your rising time slightly.
- Lukewarm water: Too hot and you'll kill the yeast, too cold and nothing happens—aim for the temperature of a comfortable bath, around 40°C.
- Extra-virgin olive oil: Use the good stuff here because you taste it directly; cheap oil will make the whole thing taste tinny and forgettable.
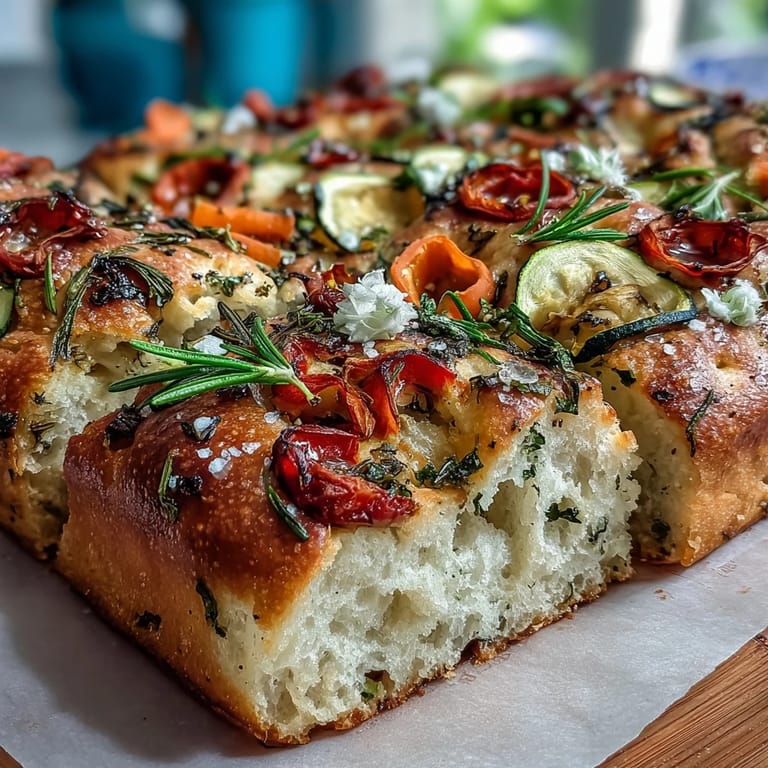
- Bell peppers, zucchini, and carrot ribbons: A mandoline is your secret weapon for getting them thin enough that they soften and curl slightly in the oven, which makes arranging them easier and eating them more pleasant.
- Fresh herbs: Mix whatever you have—rosemary and thyme are sturdy and add real flavor, while basil and parsley are softer and look more delicate as finishing touches.
- Cherry tomatoes: Halving them creates natural petal shapes; use the best ones you can find because they're front and center on the bread.
- Flaky sea salt: The finishing salt matters because it catches light and adds texture that regular table salt never could.
Tired of Takeout? 🥡
Get 10 meals you can make faster than delivery arrives. Seriously.
One email. No spam. Unsubscribe anytime.
Instructions
- Build the dough:
- Mix your flour, yeast, sugar, and salt in a large bowl, then create a well and pour in the water and olive oil. Stir until everything comes together into a shaggy, sticky mass that looks almost impossible to work with.
- Knead into silkiness:
- Flour your work surface and knead for 8 to 10 minutes by hand (or use a stand mixer for 5 to 7), working until the dough becomes smooth and elastic and actually feels nice under your hands. You'll know it's ready when it springs back when you poke it.
- Let it rise:
- Oil a bowl, place your dough inside, cover it with a damp cloth, and leave it in a warm spot for 1 to 2 hours until it's doubled in size. A proofing box works, but so does a warm corner of your kitchen or even your oven with just the light on.
- Prepare your canvas:
- Preheat the oven to 220°C and line a large baking sheet with parchment paper, drizzling it with olive oil. This prevents sticking and adds another layer of flavor to the bottom of the bread.
- Stretch and dimple:
- Punch down your risen dough, transfer it to the oiled baking sheet, and stretch it to fit, then use your fingertips to create dimples all over the surface. These dimples catch oil and herbs and create pockets of flavor.
- Brush generously:
- Give the dough a good coating of olive oil with a pastry brush, making sure you reach into all those dimples you just made.
- Create your flower garden:
- This is where the fun happens and there are no rules except to make it beautiful. Arrange your thinly sliced vegetables to create flower shapes using bell pepper rings as outer petals, tomato halves as centers, asparagus spears as stems, herbs as leaves, and carrot ribbons as delicate details. Step back and look at it from above, the way your guests will see it on the table.
- Season and rest:
- Sprinkle flaky sea salt and freshly ground black pepper over everything, then let the decorated dough rest uncovered for 10 to 15 minutes while the oven finishes preheating.
- Bake until golden:
- Bake for 22 to 25 minutes, rotating the pan halfway through so the vegetables brown evenly and the edges get that deep golden color that means the crust is crispy underneath. The vegetables should be slightly caramelized at the edges, almost translucent.
- Cool before slicing:
- Let the focaccia cool on a rack for at least 10 minutes; this helps the crumb set so slices don't fall apart when you cut them and your guests don't burn their mouths on molten cheese that doesn't exist but somehow feels like it should.
 Save to Pinterest
 The morning of the baby shower, I arranged the vegetables in a pattern that made me think of my grandmother's garden, with herbs creating stems and tomatoes looking like little buds. When my sister carried that focaccia into the room and people actually gasped before asking for the recipe, I realized I'd stumbled onto something that bridges the gap between nourishment and art, between everyday bread and something that makes people slow down and really look at what they're about to eat.
Mastering the Vegetable Arrangement
The key to making this look effortless is actually spending a few minutes thinking about it beforehand. Sketch out your design on paper or in your head—decide where your flowers will go, what will be the stems, which herbs will frame the whole thing. Then when you're actually placing vegetables on the dough, you're executing a plan rather than figuring it out as you go, which saves time and stress. Some people create symmetrical patterns, others go for a wild, organic garden look; both work beautifully because the vegetables are inherently gorgeous no matter how you arrange them.
Timing and Temperature Secrets
The dough rises best in a truly warm spot—if your kitchen is cool, you might need the full 2 hours or even a bit longer. I've learned that covering the bowl with a damp cloth keeps the surface from drying out, but if you accidentally let it dry a bit, it's not a disaster; just brush it with a tiny bit of water. The second thing that changed my focaccia game was realizing that rotating the pan halfway through baking matters more than you'd think, especially if your oven has hot spots like most home ovens do.
Storage, Reheating, and Serving Ideas
This is truly best served the day you make it, still slightly warm or at room temperature, when the vegetables are at their brightest and the bread still has that gentle give to it. Leftovers can be wrapped and kept for a day, then warmed very gently in a low oven for about 10 minutes if you want to restore some of that just-baked texture. It pairs beautifully alongside a crisp white wine, sparkling lemonade with fresh mint, or even a light salad if you're looking to round out a meal.
- Serve it on a wooden board or a pretty platter so people can see the vegetable art from above.
- Slice it into rectangles or squares rather than trying for perfect triangles, which somehow always look more intentional and less fussy.
- If you're making this ahead for an event, assemble and bake it the morning of, then let it cool completely and wrap it loosely in parchment until serving time.
 Save to Pinterest
 This bread has become my go-to when I want to show up to something with food that's as much about love and intention as it is about flavor. There's something about putting this much care into arranging vegetables on bread that turns it from a side dish into a conversation starter and a memory.
Recipe FAQs
- → What type of flour is best for this focaccia?
Bread flour is ideal for achieving a chewy texture and good structure in the focaccia.
- → How long should the dough rise?
The dough should rise in a warm spot for 1 to 2 hours until it doubles in size.
- → Can I use other vegetables for the floral decoration?
Yes, feel free to use any colorful, thinly sliced seasonal vegetables to create vibrant patterns.
- → Is it necessary to rest the decorated dough before baking?
Allowing the decorated dough to rest uncovered for 10–15 minutes helps it relax and promotes even baking.
- → How should I store leftovers to keep them fresh?
Store leftover focaccia in an airtight container and reheat briefly in the oven to restore its texture.